Wood Working Shop - Desktop Organiser Idea 2
Booking Time: 3 Hrs
Max CMF Points Earned: 300
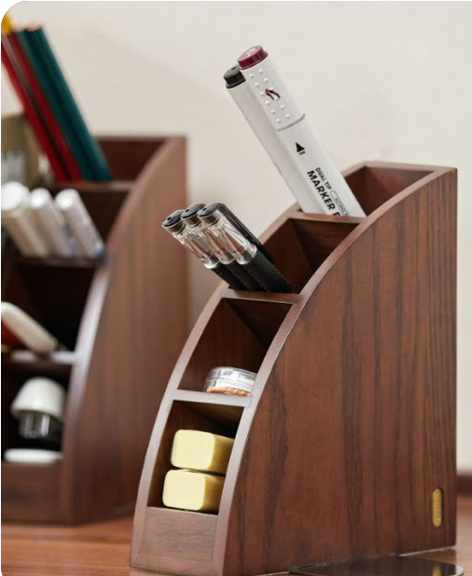
Wooden Desktop Organiser
A Wooden Desktop Organizer is a sleek and functional storage solution designed to keep your workspace neat and clutter-free. With multiple compartments, it offers an elegant way to store pens, markers, sticky notes, and other office essentials.
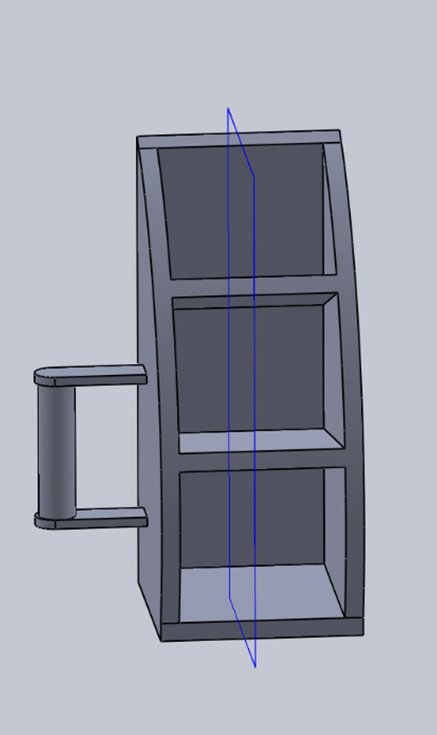
The schematic 3D model is given below (all dimension in inches)
The Process Sheet can be downloaded from here
Process Sheet
Step 0: Tools and Raw Material Required
Materials
14 mm thick plywood sheet
Wood glue
Wood screws (optional for extra strength)
Wood dowel (for cylindrical pen holder)
Sandpaper or sanding pads
Wood finish (varnish or paint)
Tools/Machines Required
Circular saw for straight cutting large blanks
Jigsaw for cutting the curved side profiles and shelf fronts
Mitre saw for precise straight cuts of smaller components
Drill press for drilling the 1-inch diameter hole for the pen holder
Router for rounding edges or adding decorative slots (optional)
Belt/disc sander for smoothing surfaces and shaping curves
Clamps for holding pieces together during glue drying
Wood lathe for turning the cylindrical pen holder (optional, or use pre-cut dowel)
For Introduction to Machines in Wood working shop click here
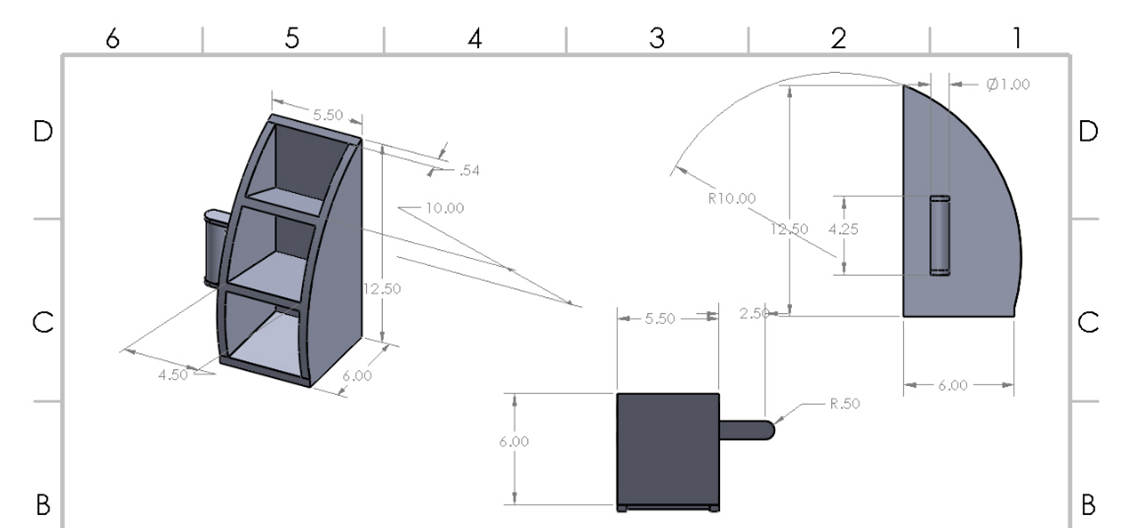
Step 1: Side Panels (2 pieces)
- Cut two 13" × 6.5" rectangular blanks from 14 mm plywood using the circular saw.
- Draw a 10" radius arc starting from the bottom rear corner and cut the top curve with the jigsaw.
- Drill a 1" diameter hole into one of the side panels using the drill press.
- Sand all edges using the belt or disc sander.
Step 2: Shelves and Bottom Panel (3 pieces)
- Cut two internal shelves of size 5.5" × 4.5" from the same 14 mm plywood.
- Cut one bottom panel of size 6" × 4.5".
- Align each shelf against the side panel and trace the curve of the side onto their front edge.
- Cut the traced curves with the jigsaw and smooth with sanding.
Step 3: Back Panel (1 piece)
- Cut one back panel measuring 12.5" × 6" from the same material.
- Sand all four edges and test-fit to ensure it sits flush with the frame.
- Do not curve the back panel — it remains rectangular.
Step 4: Pen Holder (Optional)
- Use a wood lathe to make a 1" diameter × 2.5" long dowel.
- Drill through the center with a 1" bit on the drill press if you want it hollow.
- Smooth and slightly round the ends using sandpaper or lathe tools.
Step 5: Assembly
- Glue the bottom panel between the two side panels and clamp in place.
- Install and glue the two internal shelves at the marked heights, ensuring the curved fronts face outward.
- Glue the back panel onto the rear edges of the frame.
- Insert and glue the cylindrical pen holder into its slot.
- Clamp the whole structure and let it cure for at least 4–6 hours.
Step 6: Finishing
- Sand the exterior and edges thoroughly using the belt or disc sander.
- Apply wood stain or paint uniformly over all surfaces.
- Finish with a clear protective varnish and allow to dry.