Woodworking Shop —Desktop Organiser
Booking Time: 3 Hrs
Max CMF Points Earned: 400 Pts.
Facility to Book: Wood Working Table in Wood Working Shop
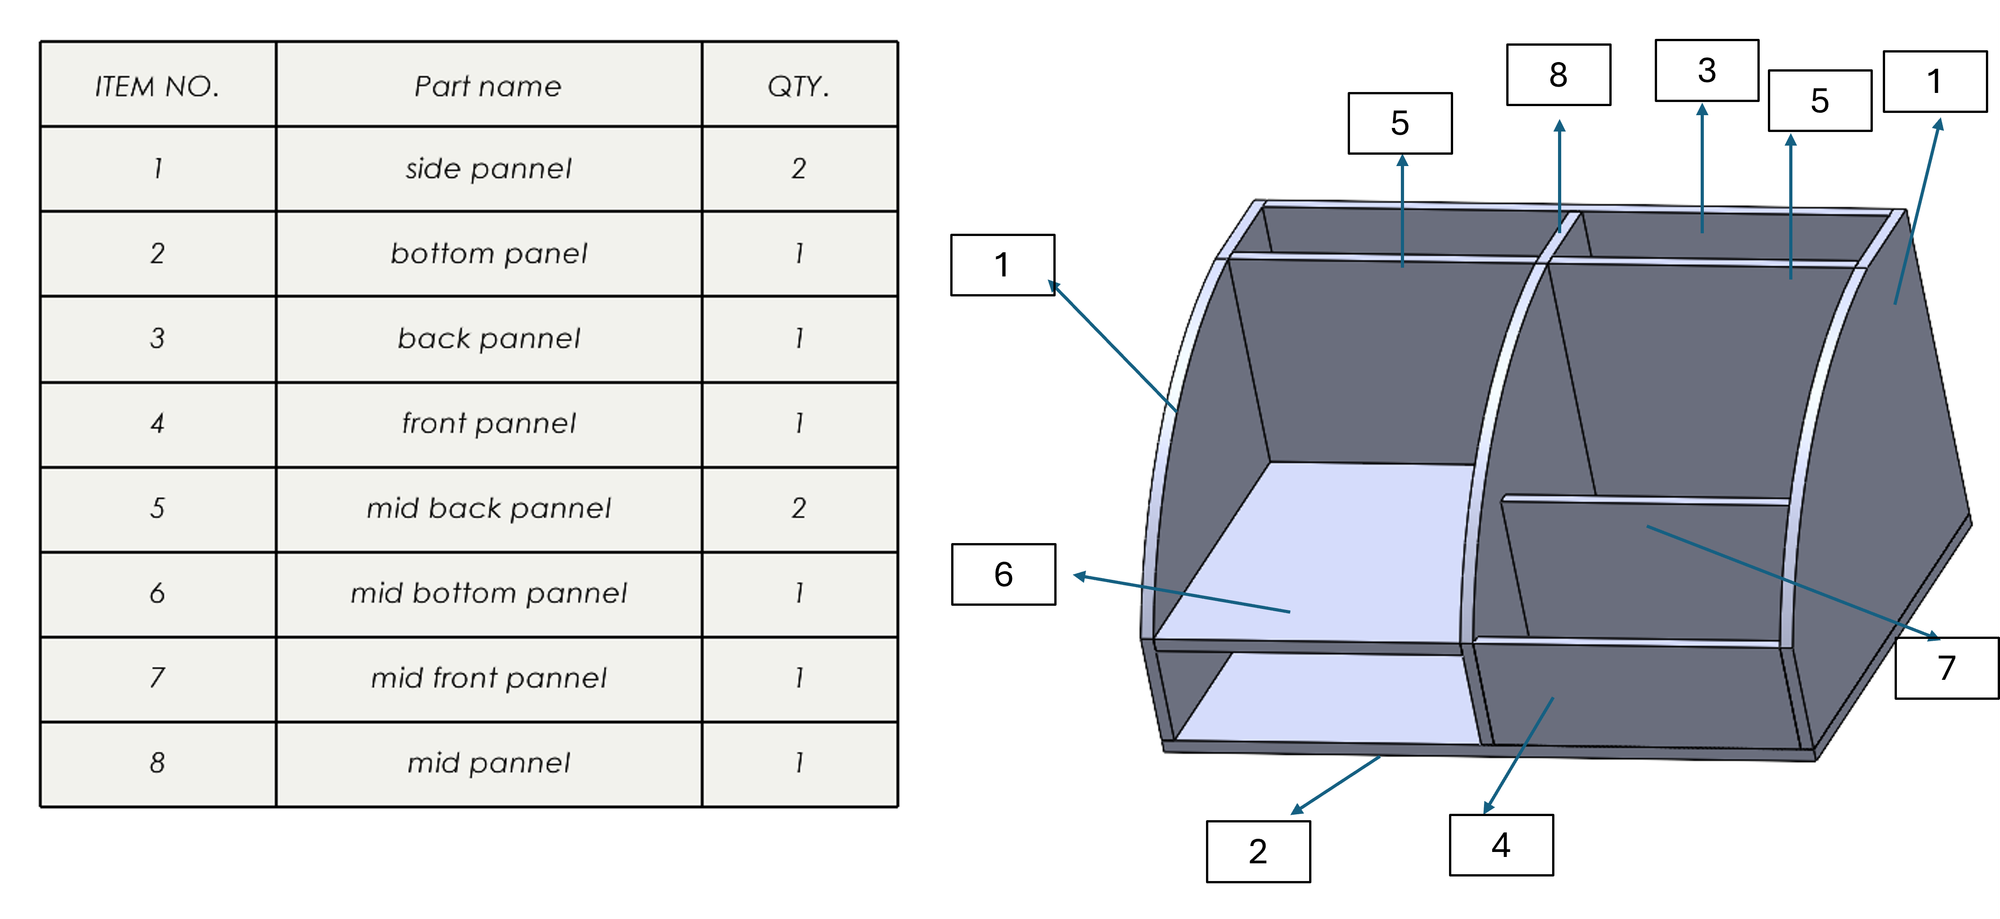
A Wooden Desktop Organizer is a sleek and functional storage solution designed to keep your workspace neat and clutter-free. With multiple compartments, it offers an elegant way to store pens, markers, sticky notes, and other office essentials.
The schematic of the design and the items are given below
The complete drawing and the dimensions of the product are as given below
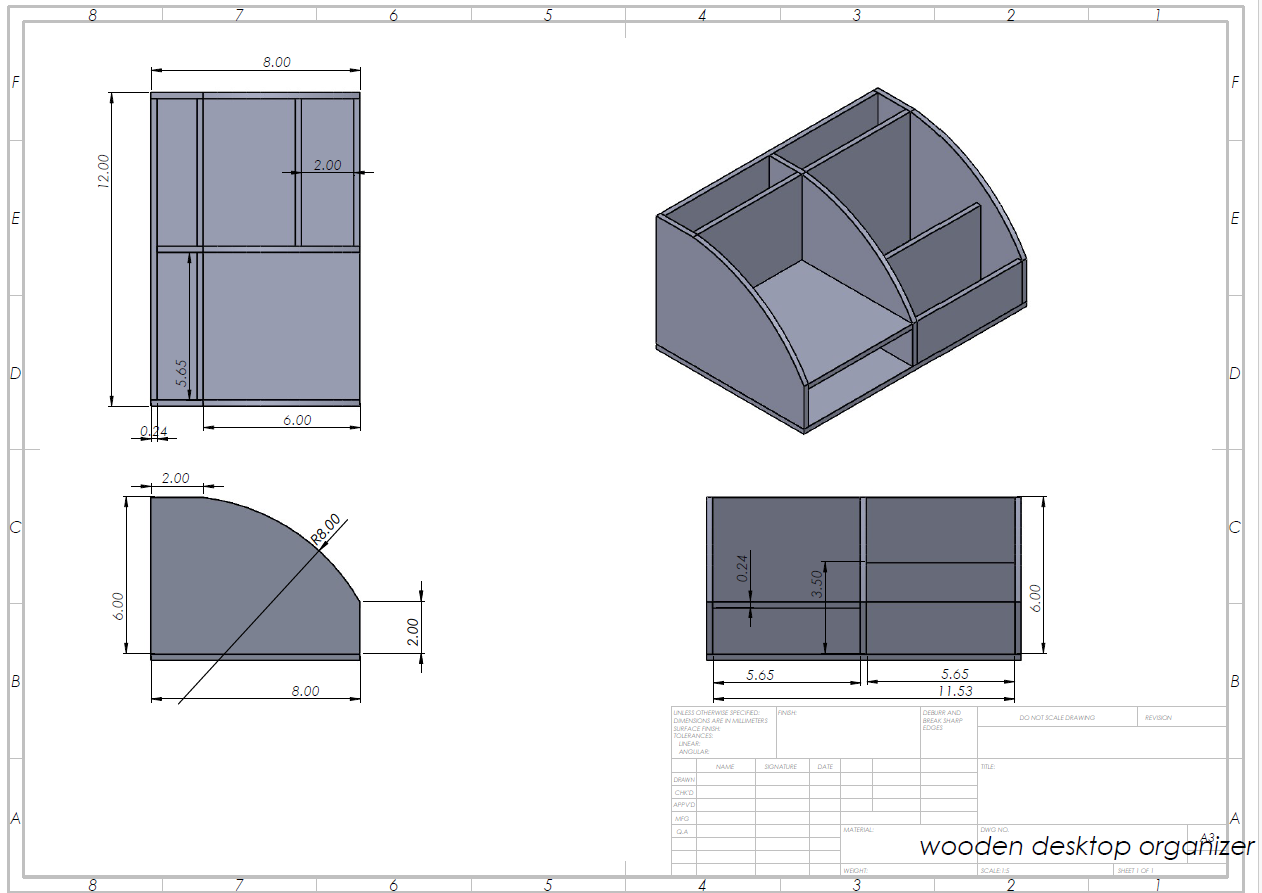
The process sheet for the product is as given below. The dimensions are given in inches
Step 0: Tools and Raw Material Required
Materials
6mm thick wooden sheet
Wood glue
Iron nails
Sandpaper or sanding pads
Wood finish
Tools/Machines Required
Circular saw for straight cutting large blanks
Jigsaw for cutting the curved side profiles and shelf fronts
Mitre saw for precise straight cuts of smaller components
Router for rounding edges
Belt/disc sander for smoothing surfaces and shaping curves
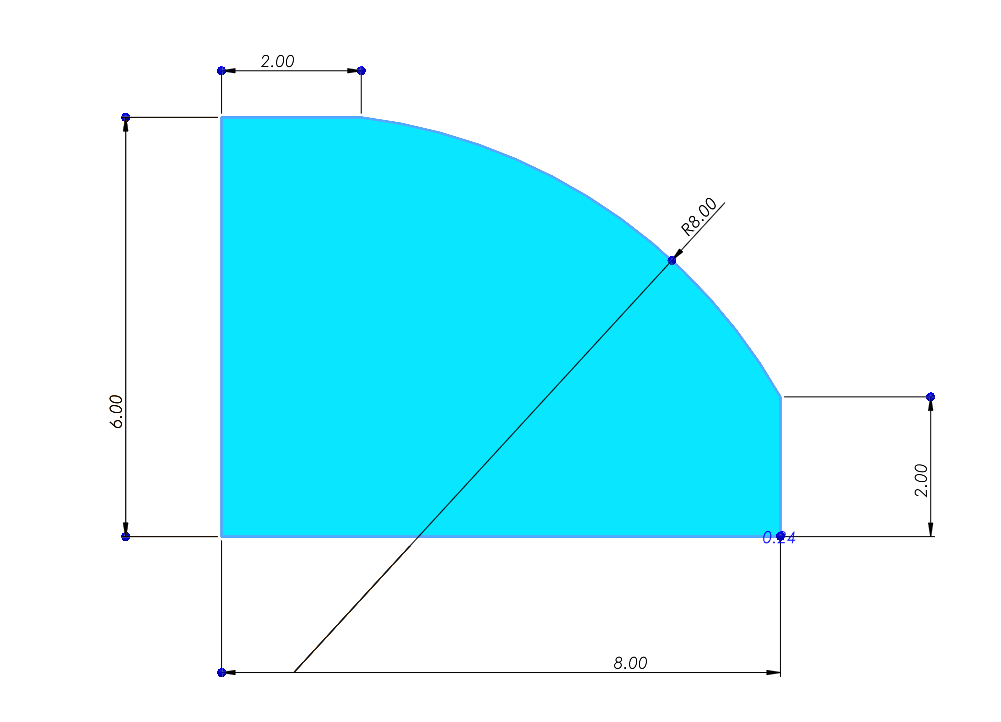
Side Panel Machining:
- Take a 6mm thick wooden sheet as the raw material.
- Mark out a working blank slightly larger than the final size, approximately 9″ × 7″, using a ruler, pencil, and square scale.
- Mark the final dimensions on the wooden sheet: height as 6.00 inches, bottom length as 8.00 inches, left vertical segment width as 2.00 inches, and right vertical segment height as 2.00 inches.
- Draw a quarter-circle arc with a radius of 8.00 inches connecting the top-left corner to the bottom-right using a compass or radius template.
- Use a circular saw to cut the initial rectangular blank from the wooden sheet.
- Use a mitre saw to make clean straight cuts on the top, bottom, and side edges.
- Use a jigsaw to carefully cut along the marked arc, following the curve slowly with a fine blade.
- Use a router to lightly round off the sharp corners if desired, except at the edges where joints will be made.
- Use a belt or disc sander to smooth all surfaces, especially the curved section.
- Use 120 to 220 grit sandpaper for final hand sanding to ensure a smooth finish.
- The side panel is now complete and ready for assembly.
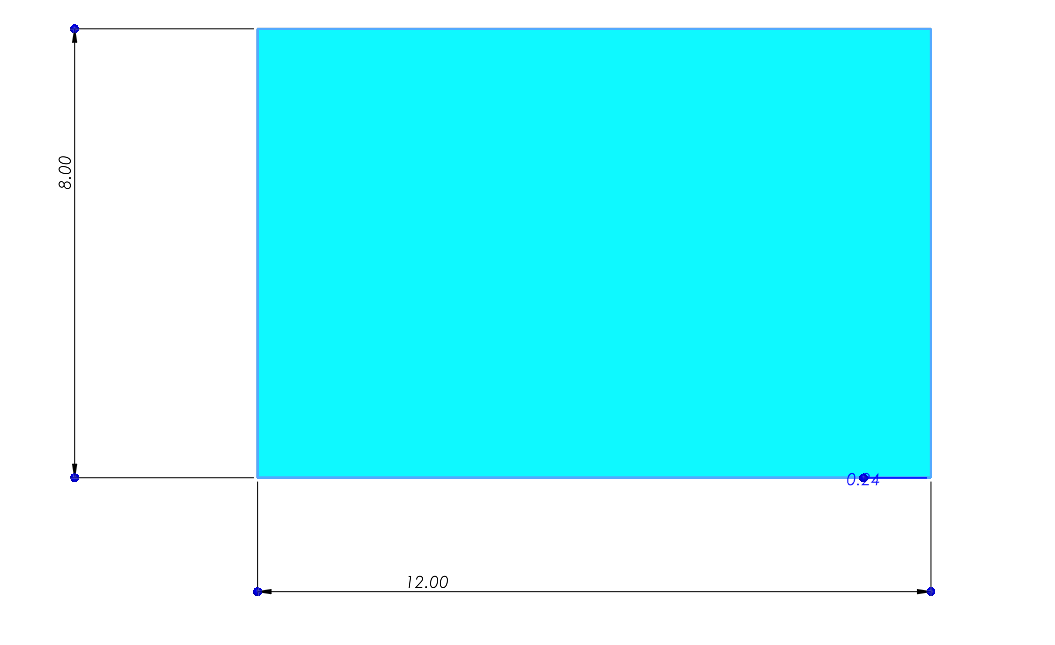
Bottom Panel Machining:
- Take a 6mm thick wooden sheet as the raw material.
- Mark out a working blank slightly larger than the final required size, approximately 13″ × 9″, using a ruler, pencil, and square scale.
- Mark the final dimensions on the wooden sheet: length as 12.00 inches and height as 8.00 inches, forming a perfect rectangle.
- Use a circular saw to cut the rectangular blank out of the sheet according to the marked lines.
- Use a mitre saw to refine the straight edges to ensure they are clean and precise at 90° corners.
- Use a belt or disc sander to smooth all four edges and surfaces, ensuring there are no splinters or uneven cuts.
- Use 120 to 220 grit sandpaper for hand-sanding the entire surface and especially the edges for a clean and safe finish.
- The bottom panel is now complete and ready for assembly.
Back Panel Machining:
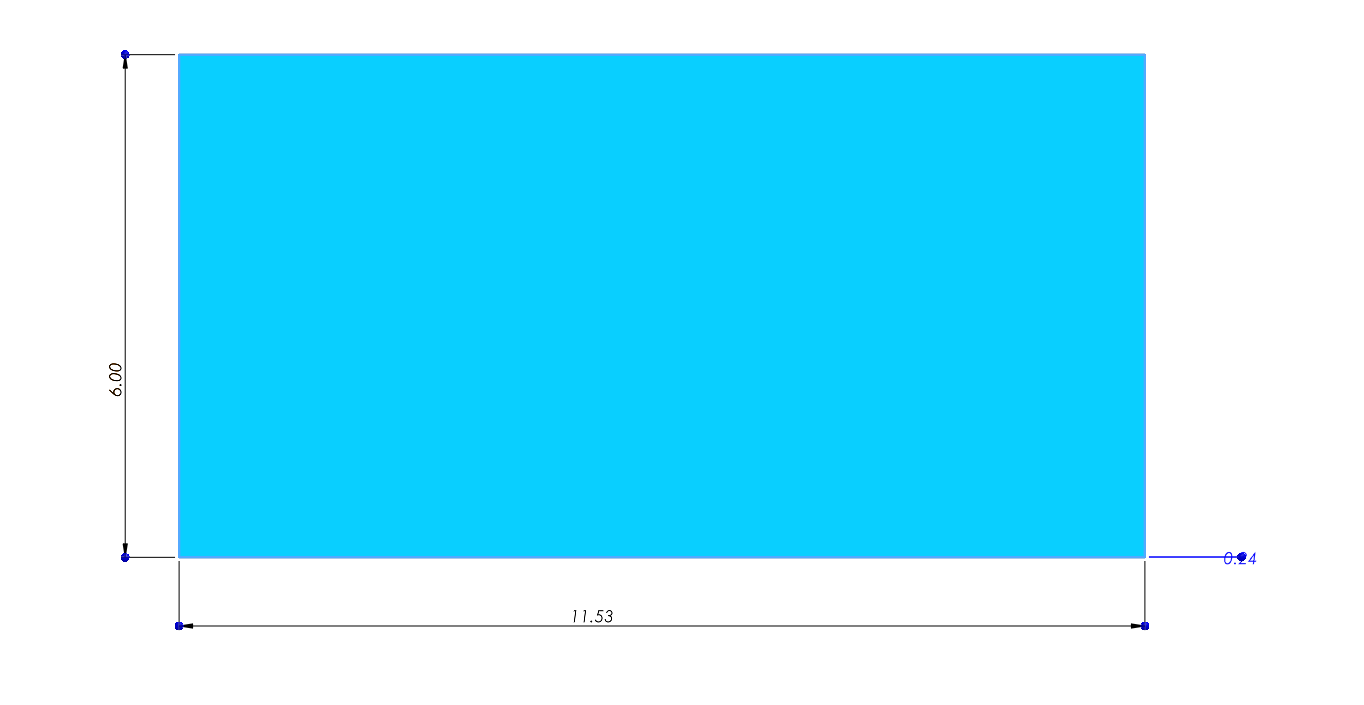
- Take a 6mm thick wooden sheet as the raw material.
- Mark out a working blank slightly larger than the final shape, approximately 12.5″ × 7″, using a ruler, pencil, and square scale.
- Mark the final dimensions on the wooden sheet: length as 11.53 inches and height as 6.00 inches, forming a perfect rectangle.
- Use a circular saw to cut the rectangular blank out of the wooden sheet along the marked lines.
- Use a mitre saw to refine all four straight edges, ensuring they are clean and meet at perfect 90° corners.
- Use a belt or disc sander to smooth all edges and surfaces evenly, removing any blade marks or roughness.
- Use 120 to 220 grit sandpaper to hand-sand all sides and corners for a clean and safe finish.
- The back panel is now complete and ready to be used in the final assembly.
Front Panel Machining:
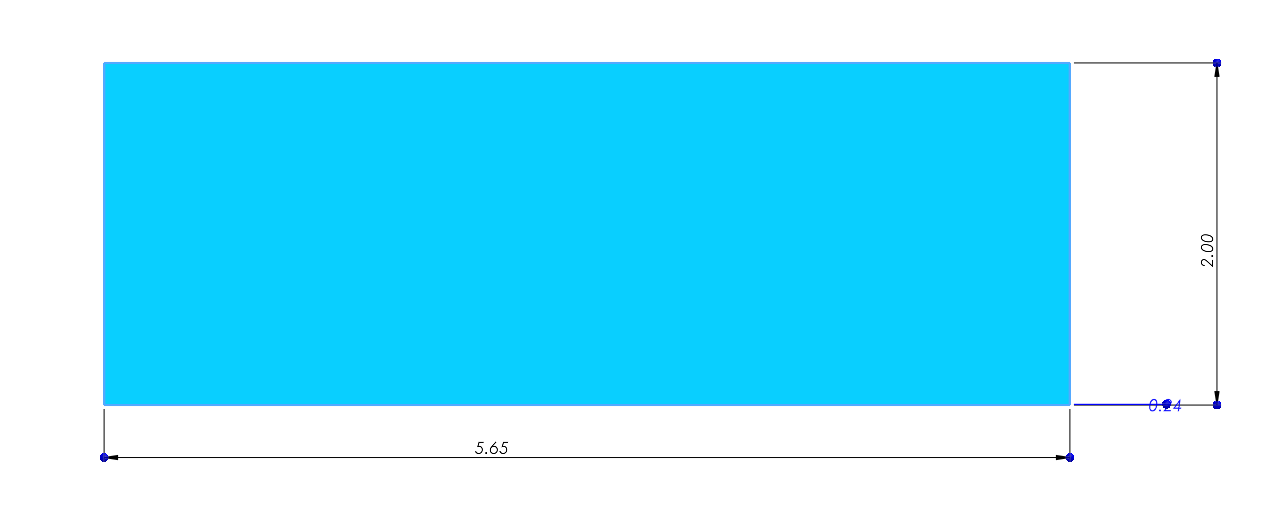
- Take a 6mm thick wooden sheet as the raw material.
- Mark out a working blank slightly larger than the final size, approximately 6.5″ × 3″, using a ruler, pencil, and square scale.
- Mark the final dimensions on the wooden sheet: length as 5.65 inches and height as 2.00 inches, forming a clean rectangle.
- Use a circular saw to cut the marked rectangle from the wooden sheet.
- Use a mitre saw to ensure that all edges are cut cleanly and corners are perfectly square (90°).
- Use a belt or disc sander to smooth out the surfaces and all four edges evenly.
- Use 120 to 220 grit sandpaper to hand-sand all sides and edges for a smooth, splinter-free finish.
- The front panel is now complete and ready to be assembled with the other components.
Mid Back Panel Machining:
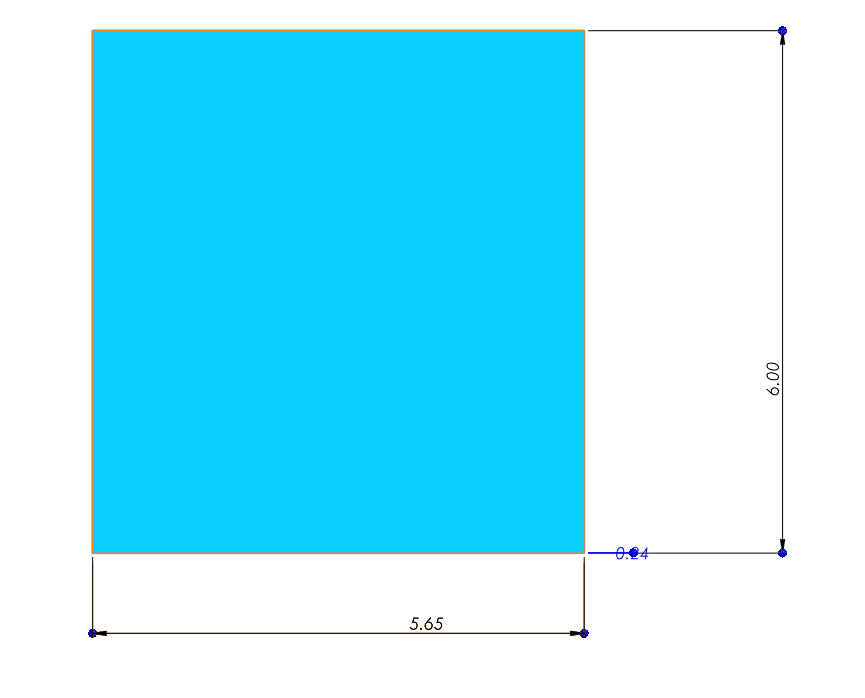
- Take a 6mm thick wooden sheet as the raw material.
- Mark out a working blank slightly larger than the final size, approximately 6.5″ × 7″, using a ruler, pencil, and square scale.
- Mark the final dimensions on the wooden sheet: width as 5.65 inches and height as 6.00 inches, forming a vertical rectangle.
- Use a circular saw to cut the marked rectangle cleanly from the wooden sheet.
- Use a mitre saw to refine the straight cuts and ensure all corners are square and accurate.
- Use a belt or disc sander to smooth the entire surface and edges evenly, especially along the cutting lines.
- Use 120 to 220 grit sandpaper to hand-sand the entire panel for a fine, splinter-free finish.
- The mid back panel is now fully machined and ready for assembly.
Mid Bottom Panel Machining:
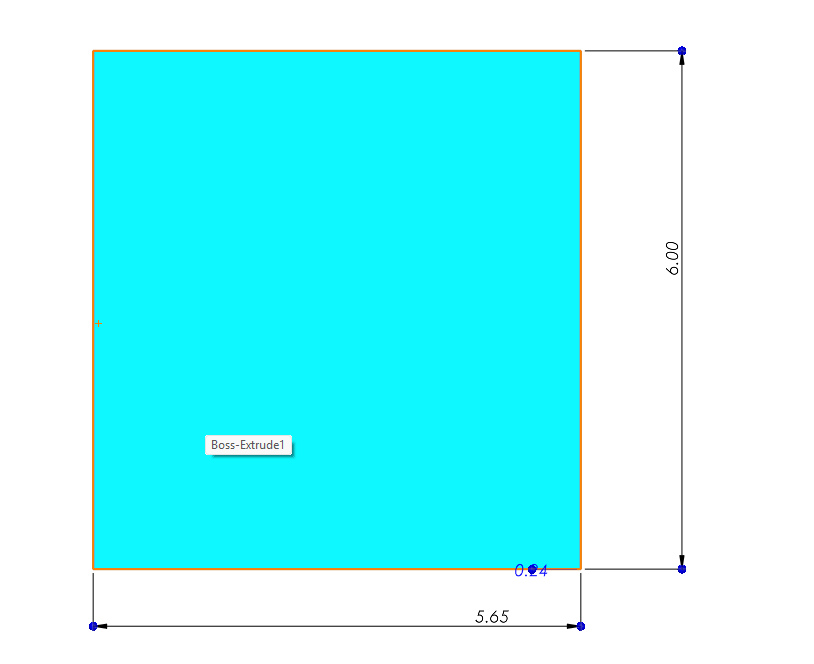
- Take a 6mm thick wooden sheet as the raw material.
- Mark out a working blank slightly larger than the final size, approximately 6.5″ × 7″, using a ruler, pencil, and square scale.
- Mark the final dimensions on the wooden sheet: width as 5.65 inches and height as 6.00 inches, forming a vertical rectangle.
- Use a circular saw to cut the marked rectangle cleanly from the wooden sheet.
- Use a mitre saw to refine the straight edges and ensure all corners are precisely 90 degrees.
- Use a belt or disc sander to smooth all surfaces and edges uniformly, removing any rough spots or saw marks.
- Use 120 to 220 grit sandpaper to hand-sand all edges and faces for a clean, splinter-free finish.
- The mid bottom panel is now complete and ready for assembly in the organizer structure.
Mid Front Panel Machining:

- Take a 6mm thick wooden sheet as the raw material.
- Mark out a working blank slightly larger than the final size, approximately 6.5″ × 4″, using a ruler, pencil, and square scale.
- Mark the final dimensions on the wooden sheet: width as 5.65 inches and height as 3.50 inches, forming a horizontal rectangle.
- Use a circular saw to cut the rectangular blank along the marked lines.
- Use a mitre saw to refine the straight edges and ensure all corners are clean and square.
- Use a belt or disc sander to smooth all sides and surfaces, paying attention to removing saw marks.
- Use 120 to 220 grit sandpaper to hand-sand the edges and surface for a smooth, splinter-free finish.
- The mid front panel is now fully machined and ready for assembly.
Mid-Panel Machining:
- Take a 6mm thick wooden sheet as the raw material.
- Mark out a working blank slightly larger than the final shape, approximately 9″ × 7″, using a ruler, pencil, and square scale.
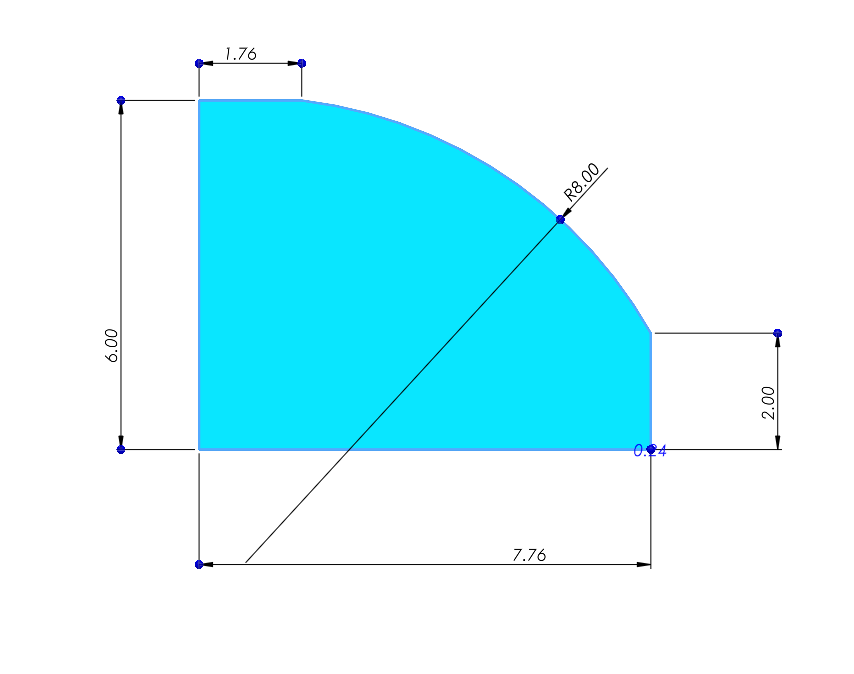
- Mark the final dimensions on the wooden sheet: total height as 6.00 inches and bottom length as 7.76 inches.
- Mark the left vertical segment width as 1.76 inches and the right vertical segment height as 2.00 inches.
- Draw a quarter-circle arc with a radius of 8.00 inches connecting the top-left and bottom-right sections using a compass or radius template.
- Carefully mark all intersections and arc points using a pencil for precision.
- Use a circular saw to cut out the initial rectangular blank from the wooden sheet.
- Use a mitre saw to cut clean straight edges along the left, bottom, and right vertical lines.
- Use a jigsaw to carefully follow the curved arc with a fine blade for a smooth cut.
- Use a belt or disc sander to smooth all cut edges, especially the curved section to remove saw marks.
- Use 120 to 220 grit sandpaper for final hand sanding of all surfaces and edges for a clean finish.
- The mid panel is now complete and ready for assembly.
Fabrication:
- Place bottom panel (Item 2) flat on the work surface to serve as the base.
- Apply wood glue along the left and right edges of the bottom panel and attach both side panels (Item 1, Qty: 2) vertically.
- Secure the side panels using nails and hammer, and use clamps to keep them square until glue sets.
- Apply glue along the back edge of the bottom and side panels, and insert the back panel (Item 3) between the side panels.
- Fix the back panel using nails through the side and bottom panels, ensuring it’s flush and square.
- Apply glue to the front edges of the bottom and side panels and attach the front panel (Item 4).
- Nail the front panel into place from the sides and bottom to secure the lower front face.
- Measure and mark internal positions on the bottom panel for spacing the mid back panels (Item 5, Qty: 2).
- Apply glue to the bottom and rear edges of each mid back panel and install them vertically inside the box, spaced as per design.
- Secure the mid back panels with nails through the back and bottom panels.
- Apply glue to both ends and the rear edge of the mid bottom panel (Item 6) and slide it into place between the two mid back panels.
- Nail the mid bottom panel into the side mid back panels for a firm hold.
- Position the mid front panel (Item 7) in front of the mid bottom panel; apply glue to the bottom and side contact areas.
- Nail the mid front panel into the side panels and mid bottom panel, forming the front face of the top compartment.
- Apply glue along the top edges of the side panels and mid back panels, then place the mid panel (Item 8) on top.
- Secure the mid panel with nails or clamps, ensuring alignment with all vertical panels below.
- Wipe away excess glue, ensure squareness, and let the full assembly dry under clamp pressure.