Arduino Programming

Duration: 1 Hr
Training Points Earned: 100 pts.
Facility to Book: Workstation
Arduino designs, manufactures, and supports electronic devices and software, allowing people around the world to easily access advanced technologies that interact with the physical world. Our products are straightforward, simple, and powerful, ready to satisfy users’ needs from students to makers and all the way to professional developers. {Source}
Step 1. Installing the Arduino IDE
Step 2. Arduino IDE Introduction and Uploading code to the Arduino Board
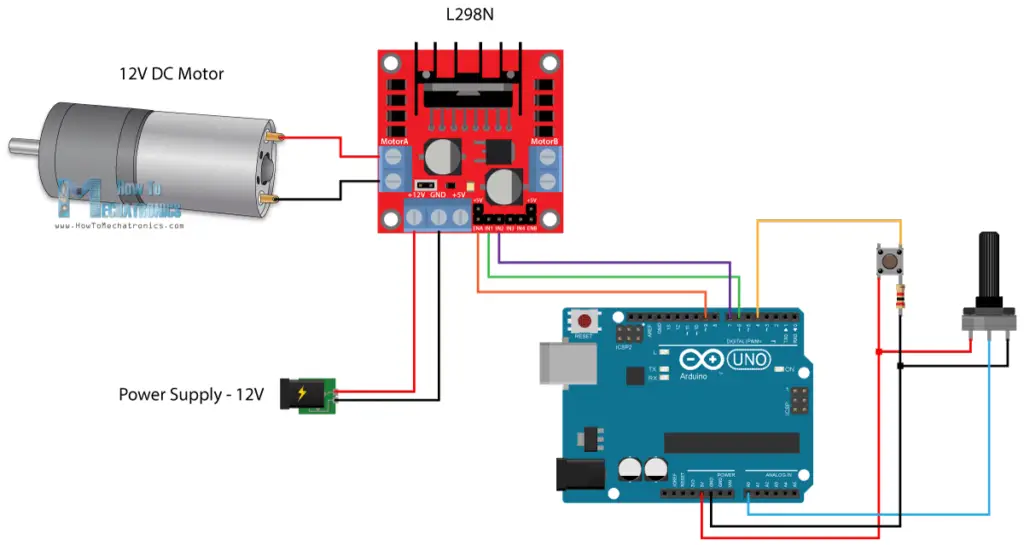
Objective: Driving Motor using Arduino
To control the speed of the motor using a potentiometer and change the rotation direction using a push button.
Required Components:
- L298N Motor Driver
- 12V DC motor
- Arduino Board
- Breadboard
- Jumpers
- Potentiometer
- 12V battery
- Pushbutton
- Resistor
Circuit Schematic:
Precautions to take while making connections
- Make sure to set the potentiometer at the lowest value
- Make sure you keep the positive(+ve) and negative(-ve) terminals apart as it will generate spark as soon as they get connected.
- Connect the power supply at the very end of circuit connections
- After connecting the power supply, then only give power to Arduino. As soon as Arduino gets connected to power supply it will run the code that may have been uploaded on it previously.
Arduino Code:
/*  Arduino DC Motor Control - PWM | H-Bridge | L298N  -  Example 01

    by Dejan Nedelkovski, www.HowToMechatronics.com
*/

/*
  We need to define the pins and some
  variables needed for the program
*/
#define enA 9
#define in1 6
#define in2 7
#define button 4

int rotDirection = 0;
int pressed = false;

/*
  In the setup section we need to set the pin modes and
  the initial rotation direction of the motor
*/
void setup() {
  pinMode(enA, OUTPUT);
  pinMode(in1, OUTPUT);
  pinMode(in2, OUTPUT);
  pinMode(button, INPUT);

  // Set initial rotation direction
  // This will start the motor as soon as you connect motor to Power source.
  digitalWrite(in1, LOW);
  digitalWrite(in2, HIGH);
}

/*
  In the loop section we start by reading the potentiometer value and then map the value that we get from it which is from 0 to 1023, to a value from 0 to 255 for the PWM signal, or that’s 0 to 100% duty cycle of the PWM signal.
*/
void loop() {
  int potValue = analogRead(A0); // Read potentiometer value
  int pwmOutput = map(potValue, 0, 1023, 0 , 255); // Map the potentiometer value from 0 to 255
  analogWrite(enA, pwmOutput); // Send PWM signal to L298N Enable pin

  // Read button - Debounce
  if (digitalRead(button) == true) {
    pressed = !pressed;
  }

  while (digitalRead(button) == true);
    delay(20);

    // If button is pressed - change rotation direction
    if (pressed == true  & rotDirection == 0) {
      digitalWrite(in1, HIGH);
      digitalWrite(in2, LOW);
      rotDirection = 1;
      delay(20);
    }

    // If button is pressed - change rotation direction
    if (pressed == false & rotDirection == 1) {
      digitalWrite(in1, LOW);
      digitalWrite(in2, HIGH);
      rotDirection = 0;
      delay(20);
    }
}